How to Disable Directory Browsing with .htaccess
What is Directory Browsing?
Directory browsing is a feature that allows web users to view the contents of a directory on a web server when no index file (like index.html or index.php) is present. This can expose sensitive files or information, posing a security risk. Disabling directory browsing is a crucial step in securing your website.
Disable Directory Browsing with .htaccess
Disabling directory browsing for an entire website can help improve website security and reduce the risk of data breaches. This simple Apache configuration directive prevents the server from displaying directory contents when no index file is present.
To disable directory browsing in Apache, you need to update or create an .htaccess file in the root directory of your website. Add the following lines to it:
This ensures that visitors cannot see the directory listing of your website, which is a good practice for security.
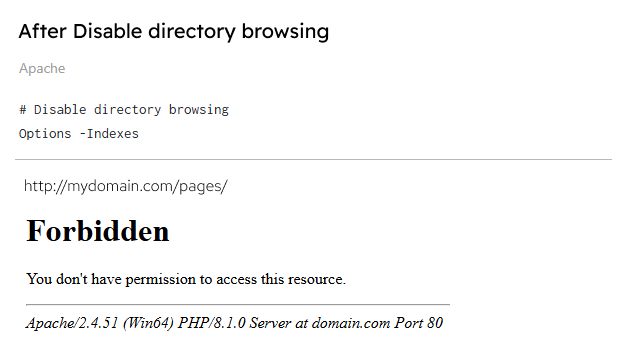
If a user tries to access a directory without an index.html, index.php, etc., they will see a 403 Forbidden error instead of a directory listing.
Steps to Disable Directory Browsing
- Locate your
.htaccessfile:- If it already exists in your website root directory, open it for editing.
- If it doesn't exist, create a new
.htaccessfile in the root directory.
- Edit the file:
- Add the
Options -Indexesdirective.
- Add the
- Save and test:
- Save the changes.
- Test by accessing a directory without an
indexfile to ensure directory browsing is disabled.
Use Case
This technique is suitable for websites hosted on Apache servers where preventing unauthorized access to directory contents is essential. For example:
- Websites with configuration files, logs, or backups stored in web-accessible directories.
- Development environments where directory listing can expose project files.
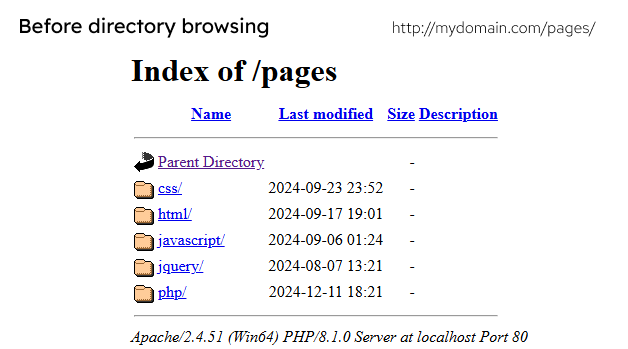
Demo: Before And After Disabled Directory Browsing
See the images before and after preview directory listing
Before Listing Directory

After 403 Forbidden

Disable Directory Browsing for Specific Directories
Disabling directory browsing for specific directories can help improve website security and reduce the risk of data breaches.
To disable directory browsing for a specific directory, you can add the following code to your .htaccess file:
# Disable directory browsing for the /images directory
<Directory /var/www/html/images>
    Options -Indexes
</Directory>
This code will disable directory browsing for the /images directory, preventing users from accessing the directory contents.
Disable Directory Browsing for Specific File Types
Disabling directory browsing for specific file types can help prevent unauthorized access to sensitive files. This can be achieved by using the Files directive in a .htaccess file.
To disable directory browsing for a specific file type, you can add the following code to your .htaccess file:
This code will disable directory browsing for .pdf files, preventing users from accessing the file contents.
Security Benefits
Disabling directory browsing provides the following security advantages:
- Prevents unauthorized users from viewing files in your directories.
- Reduces the risk of exposing sensitive data like configuration files or backups.
- Mitigates potential reconnaissance by attackers seeking exploitable files.
Troubleshooting
If the .htaccess file does not seem to work, follow these troubleshooting steps:
1. Check if .htaccess Files Are Enabled
In your Apache configuration file (httpd.conf, apache2.conf, or a virtual host file), ensure the AllowOverride directive is properly configured.
Locate the directory block for your website. It might look like this:
If AllowOverride is set to None, change it to All, then restart Apache:
sudo systemctl restart apache2  # For Ubuntu/Debian
sudo systemctl restart httpd    # For CentOS/Fedora
2. Ensure .htaccess File Is in the Correct Directory
Place the .htaccess file in the root directory of your website (e.g., /var/www/html or /username/public_html/).
Verify that the file is named exactly .htaccess (no file extension).
3. Check File Permissions
Ensure that the .htaccess file has the correct permissions. Typically:
This makes the file readable by the webserver but not writable by others.
4. Enable Apache Modules
The mod_rewrite and mod_headers modules must be enabled for .htaccess to work correctly. To enable them:
5. Inspect Apache Logs
If changes still don't take effect, check the Apache error log for issues:
sudo tail -f /var/log/apache2/error.log  # For Ubuntu/Debian
sudo tail -f /var/log/httpd/error_log    # For CentOS/Fedora
6. Check Virtual Host Configuration
If you are using virtual hosts, ensure .htaccess is not explicitly overridden or disabled. In the <VirtualHost> block:
<VirtualHost *:80>
    ServerName example.com
    DocumentRoot /var/www/html
    <Directory /var/www/html>
        AllowOverride All
        Require all granted
    </Directory>
</VirtualHost>
After making these changes, restart Apache and test the .htaccess functionality again.